Most retakes don't come from saying the wrong thing. They come from not knowing what's next: a pop-up you forgot about, a field that needs a name you haven't made up yet, a step you skipped and had to come back for. Ten minutes of planning fixes most of that. This guide shows how to plan a software walkthrough so you can record it in one go, and ends with a template you can copy.
1. Pick one task and one viewer
Write down, in one sentence, what the viewer will be able to do when the video ends: "Create a quote for a customer with a contract price and send it for approval." If you need "and" twice, it's probably two videos.
Then name the viewer: a new sales rep, a customer's admin, a colleague covering for you. It decides how much you explain. A new hire needs to know where the menu is; an admin doesn't.
2. Walk through it once without recording
Do the task for real, at normal speed, with a notepad next to you. Write down:
- Every click and field, using the label exactly as it's written on screen ("Add product", not "the add button").
- Where you start. The page the viewer should be on before step one.
- Everything that can go differently. A duplicate warning, a pop-up that appears the first time only, a field that's required for some records and not others, a page that loads slowly.
- What it looks like when it worked. A message, a status, a new row in a list. That's your check at the end.
This is also when you find out the task is longer than you thought. Better now than ten minutes into a take.
3. Write the step list
One line per step, starting with what to do, using the on-screen label. Under each, a line of what to say. Keep it short: it's a prompt, not a script you read word for word.
Step 1: Click Accounts
Start on the Accounts page, in the menu on the left.
Step 2: Click Brightwater Logistics
Open the customer's account and check Contract price.
Step 3: Click New quote
The account and contact are filled in. Check the currency first.
Step 4: Click Add product, pick the product, then click Add
Add what they're buying.
Step 5: Click Submit for approval
The status changes to Pending approval.
A good test: someone who has never seen the app could follow the step lines alone. If a line says "do the pricing bit", it's not specific enough yet.
4. Mark the steps that only happen sometimes
Some steps depend on the record or the day: "only if the customer has a contract price", "if a duplicate warning appears, click View duplicates". Mark them in your list ("(if it appears)" or "only if ...") so you're not thrown when they show up, and so the viewer hears the condition before the step.
Then decide what you'll do if one appears that isn't in the plan. Usually: handle it, say what it was in a sentence, and keep going. Edit it out later if it doesn't belong.
5. Prepare test data, and check what's on screen
Never record a real customer to show a process. Decide your test details before you start, so you're not making up a name on camera:
- Names: obviously invented ("Jordan Testman", "Brightwater Logistics").
- Emails: at
example.com, a domain reserved for examples that belongs to no one. - Phone numbers: 555-0100 to 555-0199, set aside for fiction.
- IDs and amounts: made up, and nothing that matches a real account.
Then check the screen itself: other tabs, the bookmarks bar, notifications, an inbox preview, a name in the corner of the app, recent files in a file picker. Whatever the camera sees, the viewer sees.
6. Keep your notes apart from what you say
Your plan has two kinds of text: what to do ("type Jordan in First name") and what to say ("type the contact's first name"). Keep them on separate lines. The notes are for you; the viewer only hears the words.
This matters most for anything sensitive. Even with test data, get in the habit of saying "the customer's email" rather than reading it out. Blurring a video covers the screen, not the sound.
7. Rehearse once, then record
Read the step list aloud while you click through once more. You'll catch the steps where you run out of words, and the ones where the screen takes a moment to change. Then record.
While recording:
- Say the step, then do it. "Click Save" (pause) click. See what to say, and when.
- If you go off the plan, keep going. Pause, say the sentence again, carry on. A clean edit later beats starting over.
- If the plan itself was wrong (a step that doesn't exist, two steps in the wrong order), pause the recording, fix the list, and carry on from there, or finish the take and fix the plan before the next one.
8. A template to copy
Task: (one sentence: what the viewer can do at the end)
Viewer: (who it's for)
Start on: (the page or screen)
Test details: (names, example.com emails, 555-01xx numbers)

Step 1: (what to click or do, with the exact label)
(what to say)
Step 2: ...
(what to say)
Step 3 (only if ...): ...
(what to say, starting with the condition)

Check at the end: (what the viewer sees when it worked)
Next video: (what to watch next)
9. If you record with GlideClip
Plan the Video and the recording bar
GlideClip's Plan the Video (in Create Clip) holds the plan and shows it while you record:
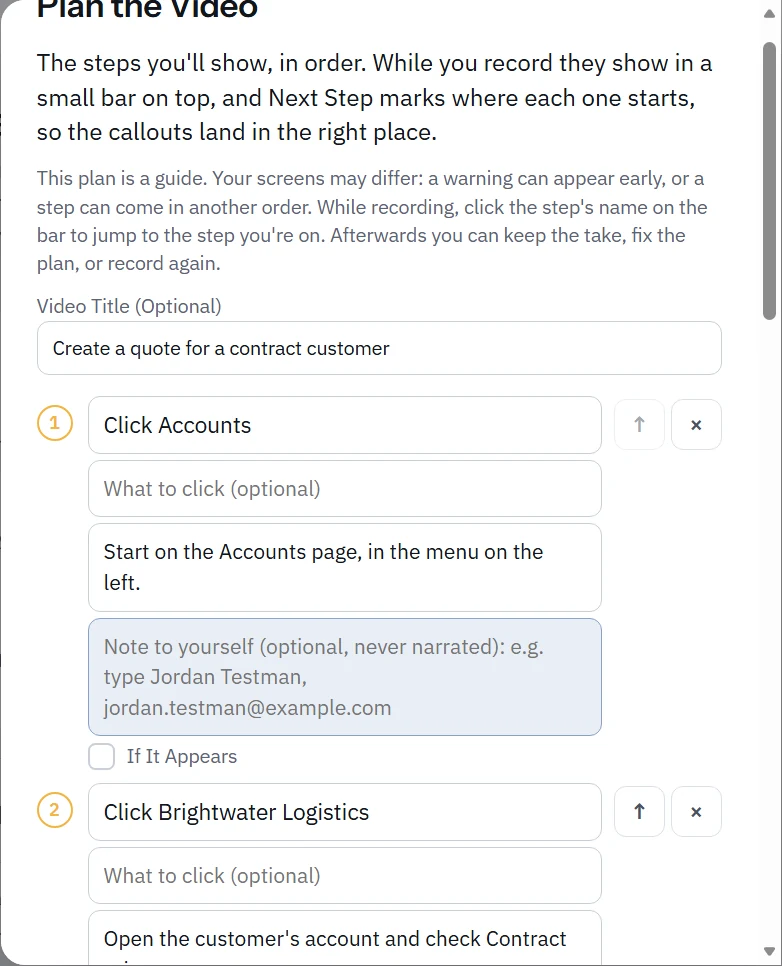
- Paste a List turns your step lines into steps, with each line under a step as its What to Say. Each step also has a Note to yourself (what to type, which record to open), shown while you record and never part of the narration, and an If It Appears box for the steps that only happen sometimes.
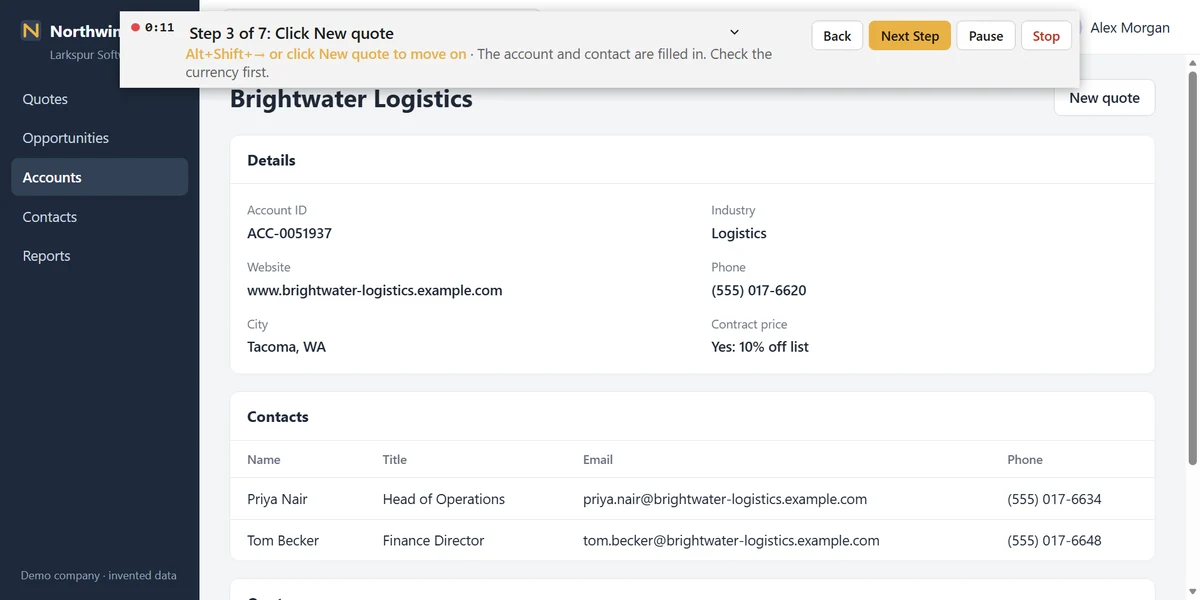
- The recording bar shows the step you're on and what to say. With the free GlideClip Recording Helper extension (Chrome Web Store, Edge Add-ons) switched on for the tab you share, the bar moves on when you click what the step says, and Alt+Shift+Right arrow moves it on from any tab, so your mouse never leaves the app you're showing. The helper notes your clicks and which fields you type in (never what you type), and its notes stay in your browser. Without it, click Next Step on the bar.
- Write the Plan with AI (Pro) writes the steps from a few questions, with made-up test details to use and a privacy check before you record.
- Plans you'll use again go to My Plans.
Changing the plan: before, during and after a take
Plans are rarely right the first time, so changing one is always a click away:
- Before you record: in Plan the Video, change any step's words, move steps up or down, delete one, or add one where it's missing. Click Edit the Plan in Create Clip to come back to it.
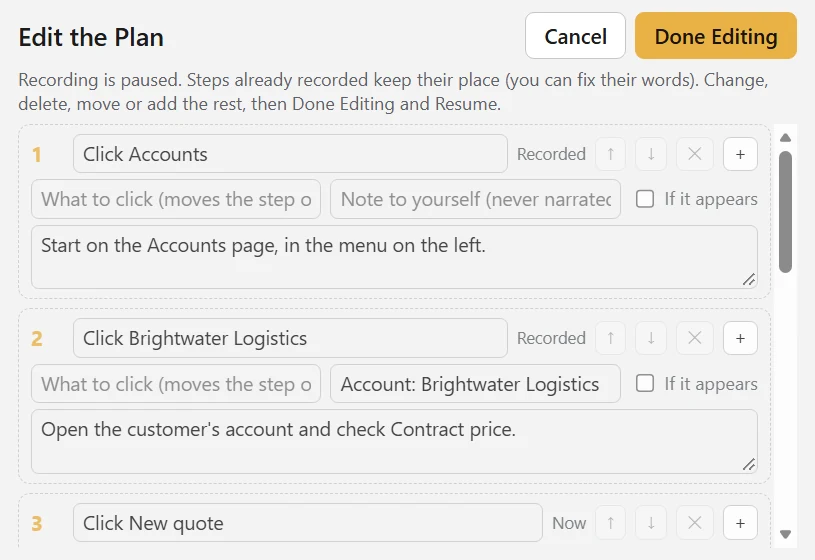
- While you record: click Pause in the recording bar, then Edit the Plan. The bar opens the plan. Steps you've already recorded (and the one you're on) keep their place, since they're in the video, but you can fix their words. Everything after can be changed, deleted, moved or added to. Done Editing, then Resume, and you carry on with the corrected plan.
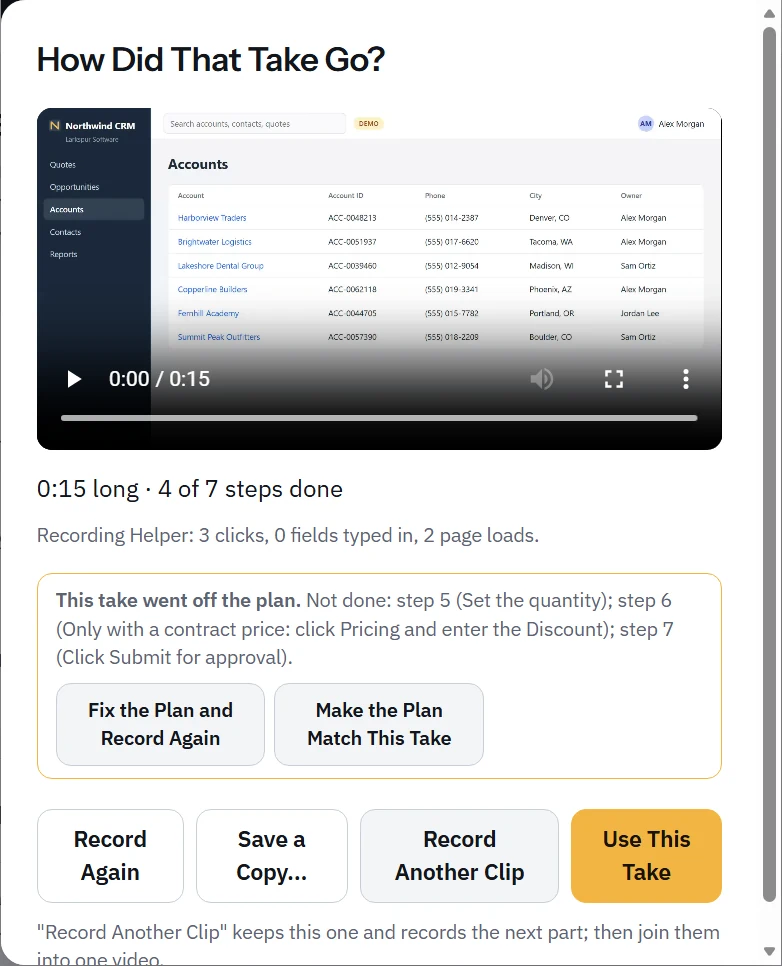
- After the take: How Did That Take Go? says if you went off the plan (steps in another order, one not done). Fix the Plan and Record Again opens the plan with what happened, for the next take. Make the Plan Match This Take keeps the take and rewrites the plan to the order you really did the steps in.
- Off plan mid-take without pausing: click the step's name in the bar to jump to the step you're on now; the video's step cards follow the order you really did them in.
Practise first
No safe app to practise on? Record our demo CRM: a made-up sales app where every name and number is invented. Or try the finished result first on the sample video, with no sign-up.
Checklist
- One task, one viewer, a title without "and"
- Walked through it once, without recording
- Step list with the exact on-screen labels, a line of what to say under each
- Sometimes-steps marked "(if it appears)" or "only if ..."
- Test details ready: invented names, example.com emails, 555-01xx numbers
- Screen checked: tabs, notifications, names in corners
- Notes (what to type) kept apart from what to say
- Rehearsed once, out loud
- A check at the end: what the viewer sees when it worked